The AI Video Production Playbook: How I Made a 90-Second Concept Video for $15
I built a production pipeline using Claude Code + 7 AI tools that turns a concept into a polished 90-second video — from one terminal, in one day, for under $15. Here's the exact workflow.


I built a production pipeline using Claude Code + 7 AI tools that turns a concept into a polished video — from one terminal, in one day, for under $15.
The Problem
Creating a 90-second concept video traditionally requires:
- A motion graphics designer ($5K–$15K)
- A voiceover artist ($500–$2K)
- 2–4 weeks of back-and-forth
- A video editor for assembly
With AI tools, one person can do this in a day — but only if you follow the right workflow. Most people waste hours fighting AI to render text correctly or regenerating entire videos because a single frame was wrong.
I learned this the hard way. My first attempt (V1) had blurry text, misspelled brand names, and a dark aesthetic that made my consumer product look like a surveillance tool. V2 — using the workflow below — fixed everything.
This playbook documents what worked.
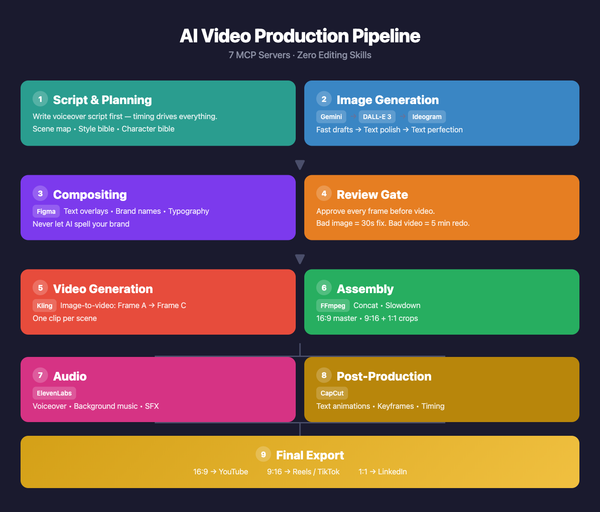
The Pipeline
The workflow has four phases. Each one feeds the next — skip a step and you'll pay for it downstream.
Phase 1: Pre-Production
- Write the voiceover script FIRST
- Time each scene to the script
- Create a scene map (what happens in each scene)
- Write a Style Bible + Character Bible
Phase 2: Image Generation
- Generate draft frames with a fast tool (Gemini via Nano Banana MCP)
- Review ALL frames as a batch
- Fix pass — edit or regenerate only the failures
- Polish text-heavy scenes with a specialized tool (DALL-E 3 or Ideogram)
- Composite in Figma — add text, branding, typography as layers
- Export final frames at 1920x1080
Phase 3: Video Generation
- Send Frame A → Frame C pairs to Kling (image-to-video)
- Check status, download clips
- Slow down clips to match scene timing from the script
Phase 4: Post-Production
- FFmpeg — concatenate all clips into one video
- Add voiceover (ElevenLabs)
- Add background music (Suno or Udio)
- Add sound effects per scene
- Final edit in CapCut — text animations, keyframes
- Export in 16:9, 9:16, and 1:1
The Tools
| Tool | Role | Why |
|---|---|---|
| Nano Banana (Gemini Flash) | Draft image generation | Fast, free, follows prompts well |
| DALL-E 3 (OpenAI) | Text-heavy image polish | Best at following complex instructions |
| Ideogram | Text perfection | Purpose-built for text in images |
| Figma | Compositing + typography | Pixel-perfect text, brand consistency |
| Kling | Image-to-video | Best stylized video gen, supports start+end frames |
| CapCut | Video editing | Text animations, keyframes, transitions |
| ElevenLabs | Voiceover | Natural narration with emotion control |
| FFmpeg | Assembly | Concat, speed, format conversion |
Every single one of these is accessible from Claude Code via MCP servers or Bash commands. One terminal. No context switching.
The 5 Rules That Save Hours
Rule 1: Images first. Always.
The entire pipeline flows downstream from your images. A blurry Frame A produces a blurry video. Fixing a bad image takes 30 seconds. Fixing a bad video means re-running a 5-minute Kling job and waiting for it all over again.
Spend 80% of your time getting images right. The rest is mechanical.
Rule 2: Never ask AI to render your brand name.
AI image generators will misspell your brand. "ProductName" becomes "ProdutcName" or "ProduceName." Every. Single. Time. I watched it happen across three different generators.
Solution: Generate the scene WITHOUT text pressure. Then open in Figma, add your brand name as a text layer with your exact font, size, and color. Export. Send to Kling. Perfect text, every time.
This applies to all important text: taglines, data labels, impact stats.
Rule 3: Write a Style Bible and reuse it.
A Style Bible is a paragraph that defines your visual aesthetic. Prepend it to every prompt so you don't re-describe the look 9 times.
Example:
LEGO stop-motion style, Pixar-quality character design, cinematic 16:9
composition, warm golden lighting, shallow depth of field, photorealistic
LEGO miniature photography.
Pair it with a Character Bible for your protagonist:
Male LEGO minifigure with glasses, black wavy hair, expressive Pixar-style
face, wearing a plaid flannel shirt.
Your prompts become: [Style Bible] + [Character Bible] + [Scene description]
This cuts prompt-writing time by 60% and keeps visual consistency across scenes.
Rule 4: Batch generate, batch review, batch fix.
Wrong: Generate Scene 1 → review → fix → generate Scene 2 → review → fix → repeat 9 times.
Right: Generate all 18 frames → review everything at once → fix only the failures.
You'll spot cross-scene inconsistencies that you'd miss going one-at-a-time. And the fix pass is faster because you've already calibrated your eye.
Rule 5: Script drives timing, not the other way around.
Most people generate 9 equal-length clips (10 seconds each) and then try to fit a voiceover on top. This creates awkward pacing.
Instead: Write the voiceover script first. Time each section. Then make scene durations match the script.
Scene 1 (problem):       12 seconds — needs time to feel the pain
Scene 2 (processing):     8 seconds — quick, mechanical
Scene 3 (concept):        8 seconds — visual, not narrative
Scene 9 (payoff):        15 seconds — emotional climax, needs to breathe
The Frame A → Frame C Strategy
For each scene, generate TWO keyframe images:
- Frame A — the starting state (establishing shot)
- Frame C — the ending state (where the motion ends)
Kling generates video that transitions from Frame A to Frame C. The more similar they are (same composition, slight changes), the smoother the video.
Good A→C pairs:
- Same scene, camera pushes in slightly
- Character changes pose (neutral → smiling)
- Objects appear or light up (cards fan out, connections glow)
Bad A→C pairs:
- Completely different compositions (Kling won't know what to do)
- Too many simultaneous changes (creates visual chaos)
The Multi-Tool Composite Workflow
This is the real unlock. Not every tool is best at everything:
| Scene type | Best tool | Why |
|---|---|---|
| Cinematic/emotional | Gemini or Midjourney | Best aesthetics and lighting |
| Text-heavy (data, labels) | DALL-E 3 or Ideogram | Best text rendering |
| Brand name visible | Any tool + Figma | Never trust AI with your brand |
| Character consistency | Same tool + Character Bible | Reference previous outputs |
The composite workflow:
- Generate the visual in Gemini (ignore text quality)
- Import PNG into Figma (1920x1080 frame)
- Add text layers — brand name, labels, data, taglines
- Add brand assets — logo, consistent colors
- Export as PNG
- Send to Kling
AI does what it's good at (visuals). Figma does what it's good at (typography). You never fight AI over spelling again.
Common Mistakes
| Mistake | Why it hurts | Fix |
|---|---|---|
| Sending "good enough" images to Kling | Bad input = bad video, and video gen is slow | Spend the extra minute editing the image |
| Fighting AI to spell your brand | You'll waste 5+ attempts | Figma text overlay |
| Vague motion prompts | "camera moves" = random motion | "slow zoom in, documents scatter slightly" |
| Adding voiceover last | Timing mismatches force re-editing | Write script first |
| Editing one scene at a time | Miss cross-scene issues | Batch generate, batch review |
| One tool for everything | Every tool has weaknesses | Multi-tool pipeline |
| Dark aesthetic for consumer product | Feels cold and intimidating | Warm, bright, Pixar-level charm |
| Internal jargon in the video | Viewers don't know your architecture | User-facing language only |
The Automation Layer
Here's what makes this workflow different from "just use Midjourney and iMovie": everything runs from Claude Code via MCP servers.
# Image generation
nano-banana → generate_image / continue_editing
openai-image → gpt_image_generate / gpt_image_edit
ideogram → ideogram_generate / ideogram_edit / ideogram_upscale

# Compositing
figma → use_figma / create_new_file / get_screenshot

# Video generation
kling → generate_image_to_video / check_video_status

# Assembly
ffmpeg → concat, speed, crop (via Bash)

# Editing
capcut → create_draft / add_video / add_text / save_draft

# Audio
elevenlabs → text-to-speech (via API)
One person. One terminal. No context switching between apps. You describe what you want, Claude generates it, you review, iterate, ship.
Cost Breakdown
For a 90-second concept video with 9 scenes:
| Item | Cost |
|---|---|
| Gemini (Nano Banana) | Free |
| DALL-E 3 (HD, ~10 images) | ~$1 |
| Ideogram (~10 images) | ~$1 |
| Figma | Included in premium |
| Kling (9 clips) | ~$5–10 |
| ElevenLabs voiceover | ~$1–3 |
| FFmpeg / CapCut | Free |
| Total | ~$8–15 |
Compare to $5,000–$15,000 for a traditional motion graphics studio. That's a 500x cost reduction.
Template: Scene Planning Sheet
Copy this for each scene in your video:
Scene [#]: [Title]
Duration: [X seconds, based on voiceover script]
Voiceover: "[Exact narration for this scene]"

Frame A (start):
- Composition: [what the camera sees]
- Key elements: [characters, objects, text]
- Mood: [emotional tone]

Frame C (end):
- What changed: [motion, new elements, lighting shift]
- Key elements: [what appeared or transformed]

Text overlays (for Figma):
- [List exact text to add in post]

Kling motion prompt:
- "[Specific motion description]"

Sound effects:
- [What sounds play during this scene]
This playbook was developed while producing a LEGO Pixar-style concept video for a SaaS product I'm building. The workflow was iterated over two production cycles (V1 and V2) and refined through real failures and fixes. V1 taught me what NOT to do. V2 — using this pipeline — produced 18 frames in under 15 minutes, all with legible text, consistent characters, and warm Pixar aesthetics.
Tools used: Claude Code (Opus) + Nano Banana + DALL-E 3 + Ideogram + Figma + Kling + CapCut + ElevenLabs + FFmpeg